| Author |  Topic Topic  |
Zagato
V4 Mad

United Kingdom
812 Posts |  Posted - 21 May 2014 : 17:59:21 Posted - 21 May 2014 : 17:59:21  
| Glorious 
1977 96L Opal Green
|  |
|
Woody
V4 Guru

United Kingdom
2764 Posts | Posted - 21 May 2014 : 20:59:28
| Great photos.
Which black wires at the dash are troubling you? | |
|
green96v4
V4 Mad
Canada
738 Posts | Posted - 21 May 2014 : 21:13:36
| Hi Woody
glad you like the images, I'll trace the blacks tonight (see which part of the loom they're in, can remember from memory!) one must go to the back of the Speedo (and has a piggyback connector) so I'm wondering if the other black I have connects to that too
I'll take a look and report back - thanks for the help! | |
|
green96v4
V4 Mad
Canada
738 Posts | Posted - 21 May 2014 : 23:24:56
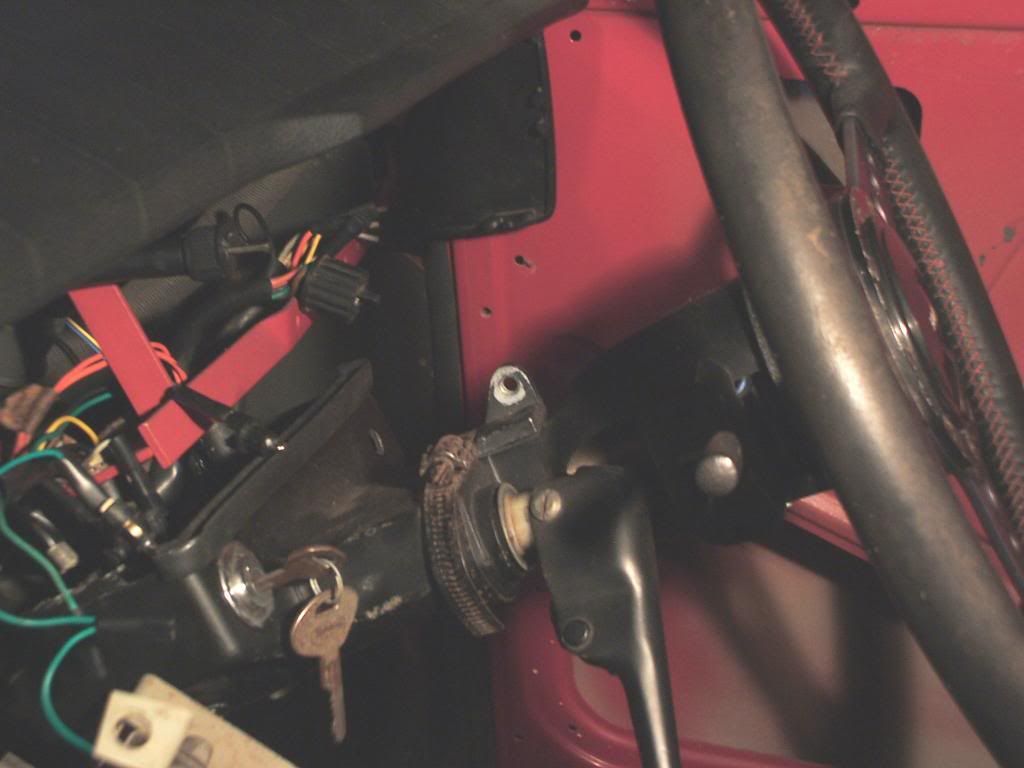
| Hi again Woody
Here's what I have question marks on:
one "finger" of the loom has
double red line - goes to the Brake warning light on the speedo cluster
Green - goes to illumination dimmer
Black - has a piggyback connector, but not sure where this should go...
Another loom "finger" has:
Black - female connector (again not sure on this one)
Blue - Main Beam warning bulb for speedo cluster
Grey - indicator warning bulb for speedo cluster
Yellow - other connection for Brake warning bulb (other side is the double red from the above finger)
This finger also has a longer extension to it with a green (that goes to the dimmer) and a blue that's unused (and is tucked back into the protective tubing
It's basically the two blacks that I'm struggling with, there is an obvious connection on the back of the Speedo cluster, I'm wondering if both plug into that (one piggybacking off the other) or have I missed something?
Help! | |
|
Woody
V4 Guru
United Kingdom
2764 Posts | Posted - 22 May 2014 : 01:58:28
| This from memory (hopefully) without going outside and laying upside down with my varifocals upside down too....
Finger one, The double red goes to brake warning light at speedo, the other ends of these are to multicontact on Combo gauge plug3 and the other to fusebox No8.
The black wire should go to the combo plug pin 12. This pigbacks to black on finger 2
Finger 2- Black connects to black of Finger one and onto the speedo body earth male spade. The other end of this wire exits on a finger near the wires for lights/fan and indicators with a ring eye to mount to the frame supporting the steering column.
The Blue wire tucked unused is the power supply for the square clock, the green as you say goes to the input side of the dimmer. You have to add a short length of green to power the bulb in the clock if fitted. another pic if it helps. Can see green wires with extra spur for clock added.
 |
Edited by - Woody on 22 May 2014 02:03:21 | |
|
green96v4
V4 Mad
Canada
738 Posts | Posted - 23 May 2014 : 01:17:53
| | Got it - perfect and thanks again Woody, you are the Yoda of all things 96 | |
|
green96v4
V4 Mad
Canada
738 Posts | Posted - 16 Jul 2014 : 16:19:56
| been a while since I posted (due to our old house requiring more attention) but I have finished to fuel tank and boot area
Wheel colour isn't strictly factory authentic, but when I was restoring them this colour was one of the (many) layers of paint on the wheels and I thought it looked better than the standard dark silver, so had them shot blasted and powder-coated (and went for the cheaper Firestone tyres as the authentic Michelins were twice the price!)
Inlaws have just come from the UK with an exhaust system in their baggage (I'm not kidding) so once that's fitted it will be ready to start up - still have to just get a battery!!
Next step is to get it started
 | |
|
green96v4
V4 Mad
Canada
738 Posts | Posted - 02 Jan 2015 : 17:31:26
| Back at the project now that winter in Canada has taken me "indoors"
so moving onto the interior, I had the seats recovered years ago (before it came off the road) but the foam is shot, managed to poke my finger straight through! so guess I'll be figuring out new foam

but back seats and all the runners, boarding and black cappings have been restored/replaced, also remade the wooden chock for the back seat support as mine had seen better days (rotten and weld burns all over it)


Also have a friend remaking the headliner, can't go too much further until that's ready |
Edited by - green96v4 on 02 Jan 2015 17:33:32 | |
|
v4admin
Forum Admin

United Kingdom
521 Posts | Posted - 02 Jan 2015 : 18:12:25
| | lovely, really nice work! | |
|
green96v4
V4 Mad
Canada
738 Posts | Posted - 03 Jan 2015 : 23:18:05
| Thanks Alec!
Been playing some more (borderline Concours obsessive now) stenciled the Swedish wording onto the backing boards today
 | |
|
UK_Sub
V4 Guru
United Kingdom
2558 Posts | Posted - 04 Jan 2015 : 09:16:38
| I didn't know they originally had writing on them! By the time I've seen them, they're a soggy and torn mess!
What material did you use? Also what did you use to replace the sound deadening? | |
|
mettersl
V4 Fan

United Kingdom
126 Posts | Posted - 04 Jan 2015 : 11:06:52
| Looks a fantastic restoration, very thorough.
| |
|
green96v4
V4 Mad
Canada
738 Posts | Posted - 04 Jan 2015 : 11:15:44
| Yes my originals were pretty messy too, when mine was on the road I went through a flooded road and took on so much water it made a fair mess of the interior!
Managed to find the same tempered board from a B&Q style shop here in Canada, even has the micro-weave texture in it. Sound deadening is from a bodyshop suppliers, sadly it's now smooth, but it's a self adhesive rubberised sheeting that I've just cut to shape
quote:
Originally posted by UK_Sub
I didn't know they originally had writing on them! By the time I've seen them, they're a soggy and torn mess!
What material did you use? Also what did you use to replace the sound deadening?
| |
|
James Ranaldi
V4 Guru
United Kingdom
1475 Posts | Posted - 04 Jan 2015 : 12:06:30
| This is fantastic work . . . . . .beyond wonderful . . . . Congratulations Matt 
My poor wee car wishes that I had 5% of your skills and dedication
1968 V4, LHD
1984 99 GL
1992 900i Convertible | |
|
transit80
V4 Mad
United Kingdom
775 Posts | Posted - 04 Jan 2015 : 18:58:15
| Matt, that is a superb looking car youve got there, well doneand keep the photos coming . .
Chris | |
|
| Topic | |
