
The SAAB V4 Web Pages - Installing a Highgate Twin 96 Exhaust under a SAAB Sonett III
The
pipes which are bolted to the engine need to be shortened. If not, they will
hang on speed-bump heigth and then you will not enjoy your exhaust for long.
These pipes consist each of two bended pipes that are welded together by means
of an oversized cuff. The best place to shorten is just above this cuff. This
way you can still use the cuffs after shortening.
|
| Right hand pipe after shortening and re-welding. The pipe was sawn into two just above the cuff. The upper half was shortened until the lower half ran parallel to the car. | |
Saw the pipes into halves just above the cuffs and take out the small
pieces of pipe that are left in the cuff. Bolt the upper parts to the engine.
Put the t-shaped pipes together with the
compensation pipe and jack it up so that they come close to the front pipes.
Shove the big silencers onto the t-shaped pipes and jack those up as well. This
way you can check for correct alignment and height. The profiles in the bottom
of the car are ideal for checking that the pipes run backward in a straight
line. The bottom of the car is a bit deepened behind the gearbox by a metal.
This is the ideal reference point for the distance between the exhaust system
and the floor of the car. Leave approximately 1,5 cms between the compensation
pipe and the metal profile.
Shove the lower part of the front pipes into
the t-shaped pipes. They should run parallel to the bottom of the car. Shove
those up to the upper half of the front pipes. This way you can find out how
much has to be sawn off of the upper halves. In my case it was ± 8 cm of the
left pipe and 3 cm of the right one. Saw off small sections at a time. When you
saw them off too short it is far more difficult to correct things.
After a bit of sawing and test-fitting everything will be in perfect
alignment. The only thing to be done is to weld the front halves together
again. Fix the pipes with 2 or 3 spot-welds before you remove them for
proper welding. This way it is prevented that the pipes will get out of
alignment again. Only half a millimeter of distortion will ruin the perfect
alignment and make it a lot more difficult to fit the whole thing decently
under the car (I experienced this the hard way)

| The result of not fixing the two front pipes with a few spot-welds before removal for proper welding: left side runs lower. Just behind the gearbox drainplug the metal profile is visible. | |
When the front pipes are welded together and
properly painted with heat-resistant paint the whole front construction can be
put into place.
For safety and resonance-prevention you can secure the front part with a
rubber block for each pipe. The clamps that are used for the big silencers can
be used as attachment points

| Front attachment. | |
In the area of the back-ends of the t-shaped
pipes there are two holes in the bottom of the car. These are good reference points for the holes to be
drilled for the rubber blocks. A few centimeters behind the holes is the
firewall. When the holes are drilled just in front of it there is less chance
of resonance and they are accessible from the engine compartiment for screwing
the rubber blocks to the car. Be careful with drilling on the left side; the
hydraulic brakelines for the back brakes are in that area.
Make connection bars out of metal or aluminium. Aluminium is easier to
bend. Drill holes in the bars for the bolts of the rubber blocks and the
clamps. On the clamp side the bars can be put between the lips where bolt runs
through

| Right hand side attachment. A little left of the rubber block the reference hole in the bottom is visible. | |
With the front end secured and the big silencers
provisorically under the car it is time to put the rear boxes into place for first fitting. First jack up
the rear of the car and take the wheels off. This way the rear suspension is
stretched to the full. Now it is easy to see how much clearance is needed for
mounting the rear boxes without rubbing or hitting anything of the suspension.
The box with the larger fastening strip in the middle is the right-hand box,
the one with the smaller strip more to the rear is the left-hand box. They can
be hung with a few pieces of metal wire to see how high and how far out they
should be positioned. The best position I experienced is with the back end of
the box just coming out under the back panel, keeping ± 0,5 cm of space between
the panel and the box. The end pipes stick out quite far, but they are still
under the bumper

| Left-hand side attachment point at the rear end. The clamp attached to the rubber has the size for clamping the cuff, which means it is too wide. A piece of cuff must be put in between to get everything tightened up. | |
In order to keep lateral movement to a minimum I
made mounts by using 4 rubber blocks, 3mm thick 3cm wide aluminium strip, an
8mm threaded rod and a lot of 8mm nuts and spring washers

| Left hand attachment construction. The rubber block in front is stuck in the rear hole of the original exhaust attachment strip. The block in the rear uses an existing hole where the non original old exhaust was attached. After the photo was made a slight change has been made in order to prevent the rear box from leaning against the car. On the front side the large aluminium strip has been put ± 2 cm outward. An extra piece of strip with two holes has been used. | |

| Right hand attachment construction. An extra lateral movement retainer still has to be made in order to prevent the box for hitting the tyre in sharp left turns. | |
The rod is very convenient when it comes to
height adjustment. In the body holes are drilled for the attachment strips of
the regular exhaust. The rear holes can be used as one of the attachment
points. An extra hole must be drilled more to the rear.
The right hand box prevents you from putting both boxes higher and more
forward; the 2”pipe runs under the spring lower seat of the rear axle. For the
rest the connection of the right hand side is not too dificult. The main body
of the box runs in good alignment with the body of the car

| Right hand box. Runs in good alignment with the body. Pipe runs precisely under the seat of the spring. This point is the cause that the rear boxes can’t be put higher and more inward. | |
The whole construction allows for some
lateral movement; a small disadvantage of the good alignment. As the box is
quite near the wheel an
extra retainer is necessary to prevent it from hitting the tyre in fast
left-hand turns. For security it is good to do this with both pipes.
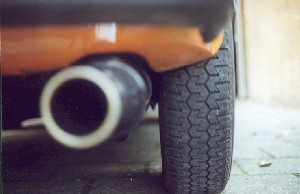
| Right hand rear box runs very close to the wheel | |
The left hand box is more complicated. The combination of the place
where the fastening strip is welded to the body and the way the 2” pipe is bent
makes it more difficult to have the main body of the box run in alignment with
the body of the car. When you look from behind the box angles outward

| Left hand box. Alignment is not good. Box hits the car at the front end. Pipe runs to the left. This can’t be changed unless the fastening strip is welded under another angle to the box. | |
In my case it rubbed at the front end at
first. The 2” pipe runs outward and is much closer to the wheel than on the
other side. I made an adjustment on the
fastening strip (after the photo was taken). I moved the strip outward on the
front side by using a double piece of aluminium strip with two holes ± 2 cm
apart. This freed the box from the body
of the car.
The final thing is to make the connection between the big silencers and
the rear boxes by shortening the s-bent pipes. These pipes also need to be
secured to the floor. The best place to do is at the end of a well in the
floor. This well gives space to the side link body bracket (photo 5). The main advantage of this
point is that it is enclosed by folds in the floor, so less chance of
vibration. Moreover, in the interior it is just in front of the rear wall , so it is easy for screwing
the rubber block to the floor and extra vibration prevention.

| The final result: jet-propelled Sonett. | |

| Attachment of the rear rubber block on the inside. It is just in front of the rear wall | |